

Ensuring the health of our car’s battery is crucial for maintaining its reliability and avoiding the inconvenience of unexpected breakdowns. As the heart of the vehicle's electrical system, the battery not only starts the engine but also powers all the car accessories, from headlights to the radio. Testing a car battery periodically can help us preempt issues, guaranteeing that the vehicle is ready to go when we are. With the right approach and tools, this task can be both simple and insightful, preventing the need for a jumpstart or, worse, a complete recharge or replacement due to negligence.
In this article, we’ll delve into the essentials of how to effectively test a car battery, starting with gathering the necessary tools, such as a multimeter, which is indispensable for measuring battery charge accurately. We'll explore the steps for using a multimeter to assess the health of a battery, look at the physical signs of wear like corrosion, and discuss maintenance practices to extend the lifespan of the battery. Additionally, understanding the role of the alternator in recharging the battery while the car is running will be covered, underscoring the importance of an integrated approach to diagnosing electrical issues. Through these guided methods, we aim to empower car owners with the knowledge to ensure their vehicle remains in peak working order.
Gathering Necessary Tools
To ensure an accurate assessment of our car battery's health, we need a few essential tools. Here's what we'll use:
Multimeter
A multimeter is crucial for checking the open circuit voltage of the battery. We'll start by using our digital multimeter to measure the voltage accurately. It's important to first remove any surface charge from the battery to ensure the multimeter provides a precise reading. This can be done by turning on the headlights for about two minutes and then turning them off before testing.
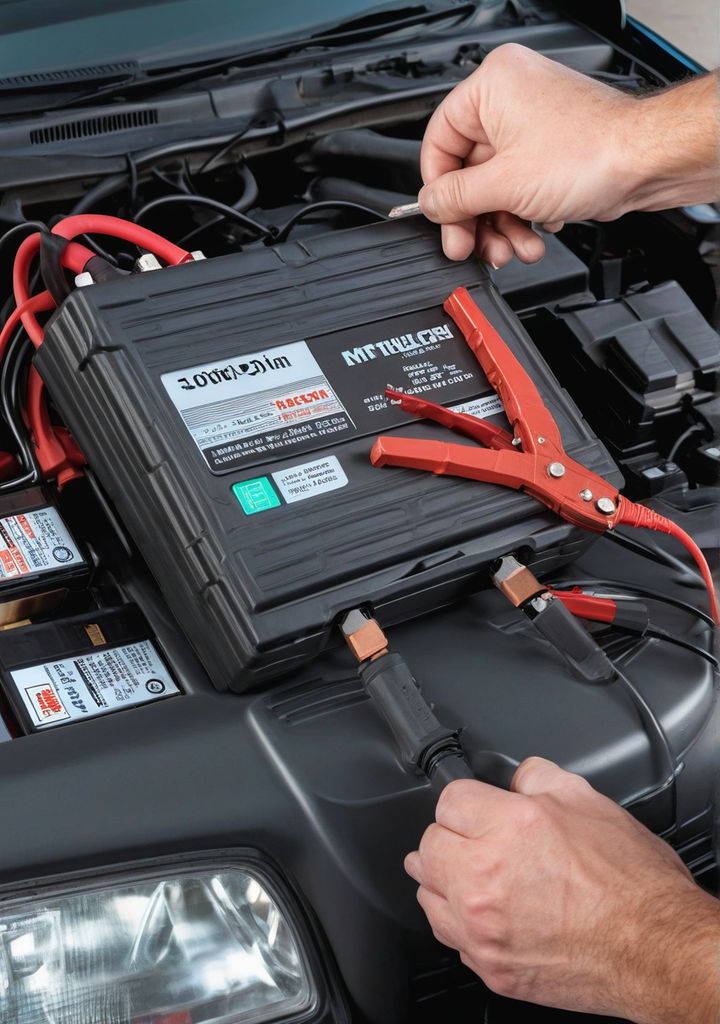
Battery Analyzer
At AutoZone, they offer a thorough battery testing process using a battery analyzer. This device not only checks the voltage but also assesses the battery's overall condition by measuring internal resistance and other voltage-related factors. It's vital to ensure that the connections to the battery are secure for the analyzer to function correctly. The results will indicate whether the battery is in good condition, needs recharging, or should be replaced.
Hydrometer
A hydrometer is used to check the specific gravity of the electrolyte in each battery cell, which is a direct indicator of the state of charge. We'll remove the vent caps and use the hydrometer to measure each cell. The scale on the hydrometer will show readings in different colors—green indicating a fully charged state and red indicating a discharged state. A reading of 1275, for instance, represents a fully charged automotive car or truck battery. Observing the fluid's clarity in the hydrometer's tube is also crucial; any blackness could suggest issues with the battery's internal plates.
By using these tools, we can conduct a comprehensive evaluation of our car battery's health, ensuring that all necessary precautions and accurate measurements are taken.
Testing with a Multimeter
To start testing our car battery with a multimeter, we first need to ensure that any surface charge is removed. This is crucial for obtaining an accurate reading. We do this by turning on the headlights for about two minutes. After turning off the headlights, we set our multimeter to the 20 volts setting to prepare for testing.
Step-by-Step Instructions
- Prepare the Multimeter: We begin by setting our multimeter to measure DC voltage, ensuring it's on the 20 volts setting, which is suitable for car batteries.
- Connect the Multimeter Probes: Next, we connect the red probe to the positive terminal and the black probe to the negative terminal of the battery. It's important to ensure that the probes are connected correctly to avoid any incorrect readings.
- Check Initial Voltage: Once connected, we observe the voltage reading. A healthy, fully charged battery should typically show a voltage between 12.2 and 12.6 volts. If the reading is around this range, the battery is generally in good condition.
- Test Under Load: To check the battery’s performance under load, we start the car. This tests the battery's ability to handle the higher energy demands of the starter motor. We watch the voltage drop momentarily and it should not fall below 10 volts. If it does, the battery might be weak and could potentially fail soon 1.
- Assess the Alternator's Charging Efficiency: With the car running, we ensure the voltage stabilizes between 13.8 and 14.4 volts. This indicates that the alternator is effectively charging the battery.
Interpreting the Results
Understanding the readings from our multimeter is key to assessing the battery's health:
- 12.2 to 12.6 Volts (Engine Off): Indicates a battery in good condition. This range suggests that the battery is sufficiently charged and healthy.
- Below 12.2 Volts (Engine Off): Signals a discharged state. If readings show less than 12.2 volts, the battery is undercharged and might need recharging or replacement.
- Above 10 Volts (During Crank Cycle): Suggests the battery has adequate turnover strength. If it falls below this, especially under 10 volts, the battery lacks the necessary power for reliable start-ups and should be checked or replaced.
- 13.8 to 14.4 Volts (Engine Running): Confirms that the alternator is charging the battery correctly. Readings below 14 volts could indicate a problem with the battery or alternator, necessitating further investigation or replacement.
By following these steps and understanding the multimeter readings, we can effectively gauge the health of our car battery, ensuring our vehicle remains reliable and ready to use.
Inspecting Physical Attributes
Checking for Corrosion
When inspecting our car battery, we first notice the battery terminals and cables. Corrosion often appears as a green or white flaky substance, similar to mold, which can significantly impact the battery's performance. This corrosion is typically composed of lead sulfate or anhydrous copper sulfate, with variations depending on the chemical reactions that have occurred 5. The presence of moisture and salt can accelerate this corrosion, potentially leading to unstable battery performance and difficulties in starting the vehicle. To manage this, we can clean the corrosion using a mixture of baking soda and warm water, applying it gently with a cloth to avoid damaging the battery.
Looking for Swelling or Cracks
Another critical aspect to check is the physical condition of the battery casing. Swelling can indicate overcharging, which often results from a faulty voltage regulator allowing the alternator to produce excessive voltage. This leads to a build-up of heat and hydrogen gas, causing the battery casing to bulge. Additionally, extreme temperatures can increase the chemical reactions inside the battery, further contributing to swelling. Cracks, especially around the battery posts, might suggest issues like positive plate growth or defective cover material, which are serious concerns that require immediate attention. If swelling or cracks are detected, it's crucial to replace the battery to prevent potential hazards such as an explosion, which can occur due to excessive gas build-up inside the battery.
Maintaining Your Car Battery
Maintaining the health of our car's battery is essential for ensuring the vehicle operates smoothly and reliably. We'll explore some vital maintenance practices that can help prolong the battery's life and enhance its performance.
Regular Checks
We start by performing regular visual inspections of the battery. This includes looking for any signs of physical damage such as cracks or bulges, which could significantly impact its performance or even lead to battery failure. It's also crucial to check the battery terminals for corrosion, as this can create resistance, making it harder for power to flow from the battery to the starter motor and other electrical systems, potentially preventing the car from starting.
Additionally, we ensure that the battery terminals are tight. Loose battery terminals can cause a poor electrical connection, impacting the performance of the vehicle's electrical systems and potentially preventing the car from starting. If the terminal connections feel loose, we tighten them using a wrench. However, it's important to avoid over-tightening as this can damage the battery posts and lead to further issues. A snug fit that doesn’t move when nudged is what we aim for.
Cleaning Terminals
Over time, battery terminals can become corroded or dirty, creating resistance that can prevent the car from starting or running efficiently. To maintain clean terminals, we use a battery cleaning solution and a wire brush to scrub away any corrosion or dirt. It's important to disconnect the battery before cleaning the terminals to avoid short circuits. Once the terminals are clean, we dry them off and reconnect the cables, ensuring the positive cable is connected first, followed by the negative one.
For more thorough cleaning, we mix baking soda with water and carefully apply it with a brush to remove all the dirt or corrosion. After brushing, we spray off the residue with cold water and then wipe clean and dry with a cloth to remove any remaining soda. We ensure not to get the battery ports wet; we're only cleaning the outside of the battery.
To protect the battery terminals from further corrosion build-up, we get a terminal spray from our auto shop or auto store. This process protects the battery from all that gunk getting into the battery cells and wearing down the battery.
By adhering to these maintenance practices, we help ensure that our car battery remains in top condition, saving us money over the course of its life and reducing the inconvenience of a failed battery that might strand us. Regular checks and cleaning are straightforward tasks that do not take much time but are crucial for the longevity and reliability of our car battery.
Conclusion
Through the exploration of essential techniques for testing a car battery's health, this article has provided car owners with the knowledge to maintain their vehicle's reliability efficiently. By utilizing tools such as the multimeter, battery analyzer, and hydrometer, alongside understanding the steps for assessing the battery's physical condition and ensuring the effectiveness of the alternator, we've underscored the importance of regular battery maintenance. These methods not only facilitate preemptive identification of potential issues but also extend the lifespan of the battery, underscoring the critical role of battery health in avoiding unexpected breakdowns and ensuring uninterrupted vehicle performance.
The significance of adhering to maintenance practices, including regular checks for corrosion, securing and cleaning of terminals, and the avoidance of overcharging, has been highlighted as pivotal for sustaining optimal battery health. By implementing these practices, individuals can enhance their vehicle's reliability and performance while safeguarding against the inconvenience of battery failures. As we conclude, the encouragement towards proactive vehicle care and the suggestion for ongoing diligence with battery maintenance reflect a commitment to automotive excellence. With these insights, car owners are better equipped to ensure their vehicle remains in peak working order, ready to serve their transportation needs reliably.
FAQs
What's the simplest method to test a car battery? To easily test a car battery, you can use a voltmeter. First, ensure the car is off. Attach the positive (red) lead of the voltmeter to the positive terminal of the battery and the negative (black) lead to the negative terminal. A normal reading on a healthy car battery should be between 12.4V and 12.7V.
How do I determine the health of my car battery? To check the health of your car battery, start by removing any covers from the battery terminals. Connect the positive side of a voltmeter to the battery's positive (red) terminal, and the negative side to the negative (black) terminal. A healthy battery typically shows a voltage between 12.4V and 12.7V.
Is there a way to check the life of a car battery without using a tester?Yes, you can check the life of a car battery without a tester by using your car's headlights. Without starting the engine, turn the headlights on and leave them on for about 10-15 minutes. Then, start your car and observe the brightness of the headlights; if they dim significantly, it may indicate a weak battery.
What is the most accurate method for testing a car battery?The most precise way to test a car battery involves multiple tests: voltage testing, load testing, and resistance testing. Using all three of these tests together provides a comprehensive assessment of the battery's condition and is the most accurate method to determine if the battery is failing.