

Installing a backup camera in your Honda Clarity 2018 can enhance your driving safety and convenience. This detailed step-by-step guide will help you through the installation process, ensuring you get the job done correctly and safely.
Tools and Materials Needed
- Screwdrivers (Phillips and flathead)
- Trim removal tools
- Multimeter for testing electrical connections
- Wire strippers and crimping tool
- Heat shrink tubing or electrical tape for insulating connections
- Zip ties for organizing and securing wiring
- Drill and bits (if custom mounting of camera is needed)
- Mounting hardware for the camera
- Display monitor and its mounting hardware
- 12V power drill (if custom mounting)
- Safety goggles
Step-by-Step Installation
1. Disconnect the Car Battery
Begin by disconnecting the negative terminal of the car battery to prevent electrical shock or short circuits.
2. Remove the Interior Trim Panel
Remove the interior trim panel of the trunk door to access the wiring behind it. Use trim removal tools to avoid damaging the panels.
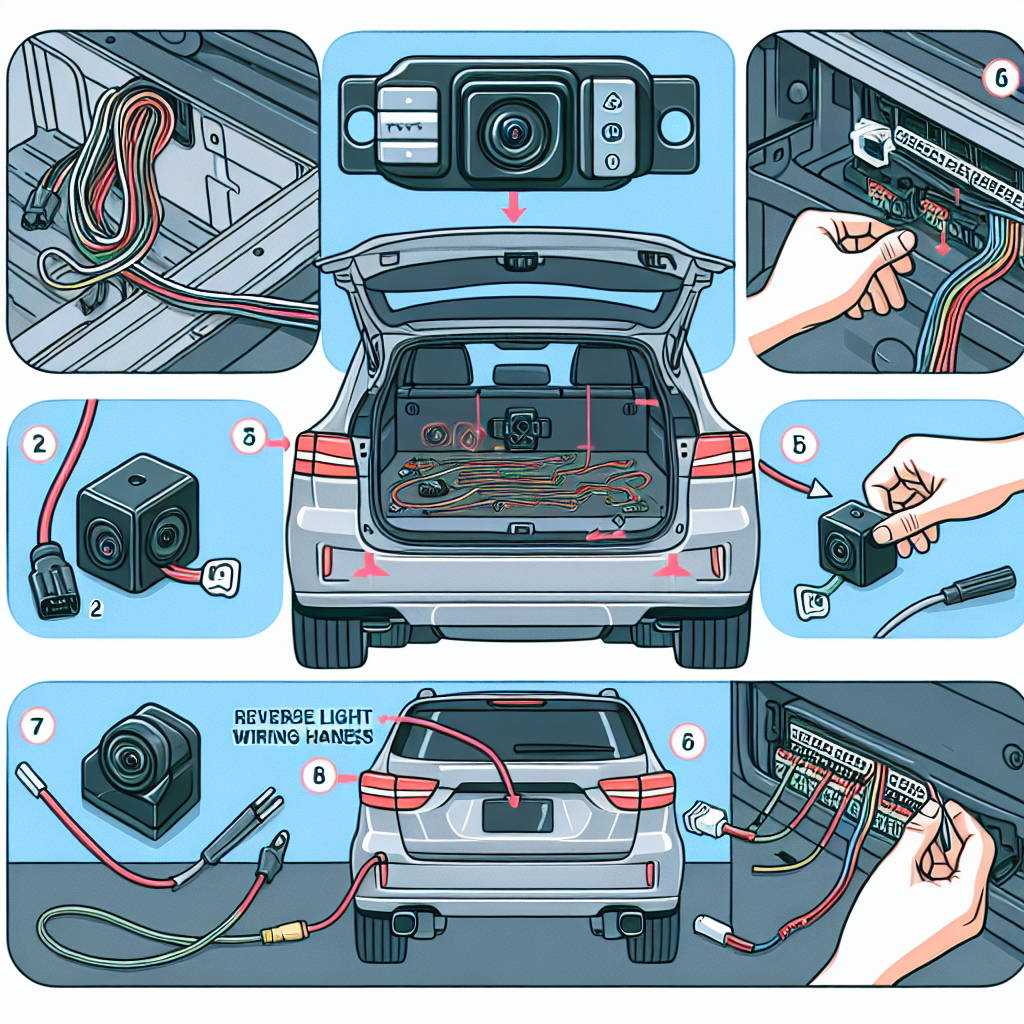
3. Locate the Reverse Light Wiring Harness
Identify the reverse light wiring harness. This is where you'll tap into the power source for the camera.
4. Mount the Camera
Mount the camera on the back of the car, ensuring it is centered and level. You may need to use a drill to create holes for the mounting hardware.
5. Route the Camera's Wiring
Route the camera's wiring through the trunk door into the cabin of the car. Be sure to leave enough slack for adjustments and future maintenance.
6. Connect the Camera's Power and Video Signal Wires
Connect the camera's power and video signal wires to the reverse light wiring harness. The power wire should be connected to the positive terminal, and the video signal wire should be spliced into the reverse light positive wire. Use a multimeter to test the connections for accuracy.
7. Install the Display Monitor
Install the display monitor inside the car, either on the dashboard or integrated into the rearview mirror. Use the provided mounting hardware.
8. Connect the Monitor to the Camera's Video Signal Wire
Connect the monitor to the camera's video signal wire. This may require routing the wire through the car's interior trim. Ensure all connections are secure and insulated with heat shrink tubing or electrical tape.
9. Reconnect the Car Battery
Reconnect the car battery and test the camera by putting the car in reverse. Ensure the camera and monitor turn on and display the live feed correctly.
10. Secure All Wiring
Once everything is confirmed working, secure all wiring with zip ties and reassemble any trim pieces that were removed.
11. Final Testing
Test the camera and monitor again to ensure they work properly after reassembly. Make sure the camera provides a clear view and the monitor displays the feed without any issues.
Troubleshooting Tips
- Camera Fails to Turn On:
- Check the camera's power source and connections.
- Ensure it is properly connected to the reverse light wiring and has a stable power supply.
- No Display on Monitor:
- Inspect the video signal connection.
- Check for proper connection or damage in the wiring.
- Monitor Issues:
- Double-check the connections to the camera and the power source.
- Distorted Camera Image:
- Ensure the camera is mounted securely and is level.
- Reroute wiring away from possible sources of interference.
- Camera Not Switching On in Reverse:
- Recheck the reverse light wiring connection.
- Ensure it is properly connected and receiving power.
- System Reliability:
- Test the camera and monitor with multiple iterations of powering on and off.
Safety Precautions
- Disconnect the Battery: Always begin by disconnecting the car battery's negative terminal to prevent electrical shock and short circuits.
- Wear Safety Goggles: When using tools, especially when drilling, wear safety goggles to protect your eyes from debris.
- Well-lit Workspace: Work in a well-lit area to ensure clear visibility and prevent accidents.
- Secure Wiring: Ensure all wiring and connections are insulated and secure to avoid electrical hazards.
- Professional Assistance: Do not work on the vehicle's electrical system if you are not comfortable or experienced with it. Seek professional assistance if needed.
- Follow Instructions: Follow all wiring and installation steps carefully to avoid damaging the vehicle or its components.
- Thorough Testing: Test the camera and monitor multiple times, including after reassembly, to confirm proper functionality before using them on the road.
- Organize Wiring: Secure all wiring with zip ties to prevent any loose or hanging cables that could interfere with driving or become damaged.
FAQ
Q1. Can I install the backup camera myself, or should I hire a professional?
A1. If you are comfortable with basic car maintenance and electrical work, you can install the camera yourself using this guide. However, if you're unsure or inexperienced, it's recommended to hire a professional.
Q2. How long does the installation process take?
A2. Depending on your experience and the tools at hand, the installation can take anywhere from 2 to 4 hours.
Q3. Will installing the camera void my car’s warranty?
A3. Generally, installing a backup camera should not void your car's warranty. However, it's always best to check with your car manufacturer or dealership.
Q4. Can I use any backup camera, or do I need one specific for the Honda Clarity?
A4. While many backup cameras are universal, it's advisable to choose one compatible with the Honda Clarity for optimal fit and functionality.
Q5. How do I maintain the camera after installation?
A5. Regularly clean the camera lens to ensure a clear view. Periodically check the wiring and connections to ensure they remain secure and free from damage.